Maven is one of the popular build tools that is very much used in most projects for ensuring that all dependent libraries are downloaded and are made available to the application. This is particularly useful when multiple team members are working on the same project and every one of them needs to work using the same set of libraries as defined in the POM file.
If you are using the latest eclipse, you would find an embedded version of Maven which will suffice for most developer needs. However, if you are planning on using maven for other projects which are not necessarily developed using eclipse, it makes sense to install a separate copy of Maven. Also, it helps in creating applications/project structures from command prompt.
Installation of Maven on Windows is a pretty straight forward process. Download the latest maven distribution from Maven – Download Apache Maven. At the time of writing this post, 3.8.1 is the latest version. For installation on Windows systems, download the apache-maven-3.8.1-bin.zip file from the list of distributions available.

After downloading the file, unzip the file using any of the utilities like winzip or 7z to a location of your choice. I have chosen to extract the files to the location D:\Java\apache-maven-3.8.1\. After extracting the files to your choice of location in the file system, the next step is to set the MAVEN_HOME System Variable.
Check if JAVA_HOME variable is set
Maven requires JAVA_HOME variable to be set in the system variables to work. To check whether the JAVA_HOME is set, open command prompt and type in echo %JAVA_HOME%
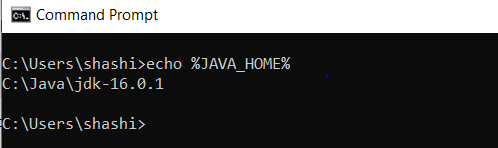
if the JAVA_HOME variable is not set, the above command will return an error. To set the JAVA_HOME in environment variables, check out the setting JAVA_HOME variable in system variables section in the post Installation of Java
Setting the MAVEN_HOME variable
To set the MAVEN_HOME in environment variables, open the Environment Variables window. One of the easiest ways to do that is type in “edit the system variables” in the search box on windows taskbar and the option pops up. Click on the top result icon to get a window as shown below:

Click on Advanced tab and then on the Environment Variables button to open a window as shown below:
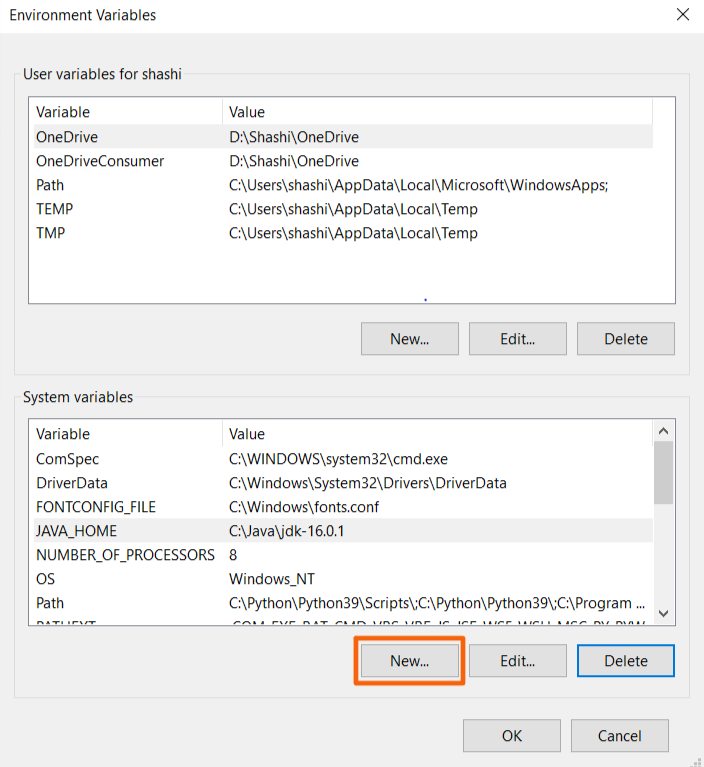
Click on the New button under System Variables to open a window to create a new System Variable.
Note: If you are not the System Administrator or if you are using a multi user system or a system provided by an organization, the same steps can be done in the User Variables section as admin privileges do not exist in those systems.
In the environment variables create a new User or System variable named MAVEN_HOME with the value as the absolute path of the Maven directory on the system. As mentioned in the note, If you are the sole user and system admin user of the system, then you can create System Variable. If you are using a shared or an organization provided system where you do not have admin rights, you can create the User Variable. In this case the path is
D:\Java\apache-maven-3.8.1

Click on OK button to save the entry.
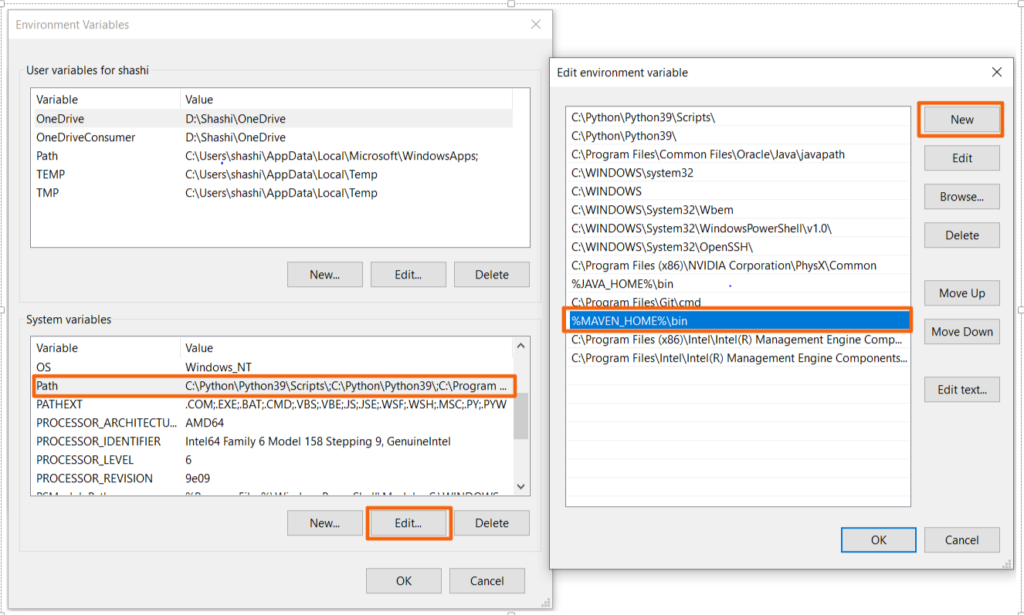
Setting %MAVEN_HOME%\bin to the path
Set the MAVEN_HOME%\bin to the path so that maven can be accessed from anywhere in the system from the command prompt. If this is not done, user needs to navigate to %MAVEN_HOME%\bin directory every time to access maven command. To edit path, open the environment variables window again as described above.
Now close the windows by closing on OK buttons across all the windows. The Maven Installation is complete on the Windows System.
Verifying the Maven Installation
Now that the maven installation is complete, verify that the maven is installed properly and is working as expected. Open the command prompt, either by typing cmd in the windows taskbar or by selecting the command prompt in the Start–>Programs–>Windows System –> Command Prompt options.
Type in mvn -v at the command prompt. If the maven installation is properly completed, the below window is displayed.
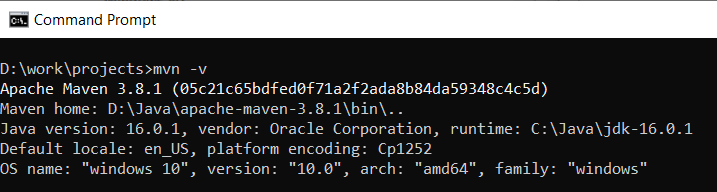
If an error message like “mvn is not an internal or external command, operable program or batch file”, then the Maven installation and configuration is not successful. Recheck JAVA_HOME, MAVEN_HOME and Maven settings on the path to debug.
To know how to create project, build application and run the application from command prompt read Create Maven Projects post.